
[ht_message mstyle="info" title="Checklist before proceeding with the Adtran Bluesocket configuration" show_icon="" id="" class="" style="" ]
Log in to your Bluesocket WLAN controller At the top click on Configuration and then on the left, under External Authentication click on Accounting Click on Create Accounting Server and enter the following: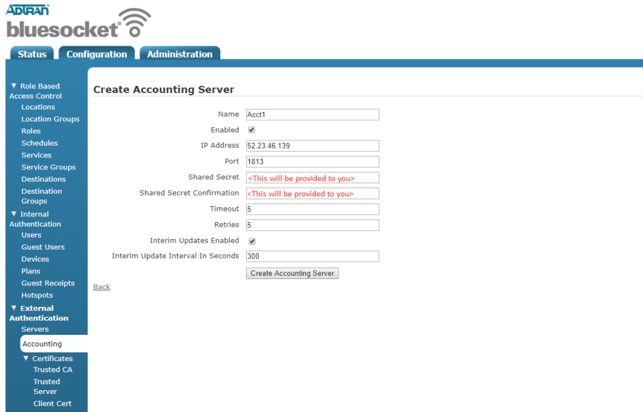 Click on
Create Accounting Server again and enter the following:
Click on
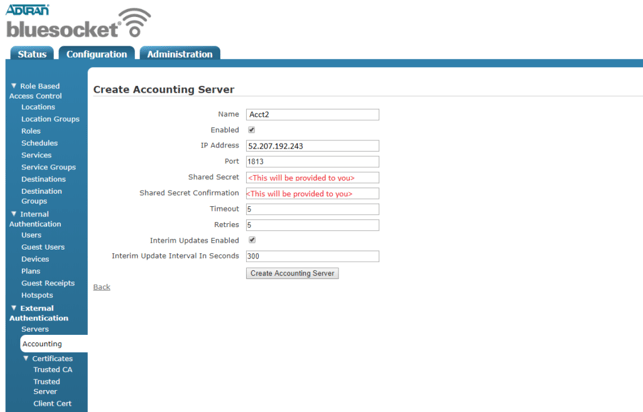
Create Accounting Server again and enter the following:
Next, on the left, under External Authentication click on Servers. Click on Create Authentication Server and enter the following: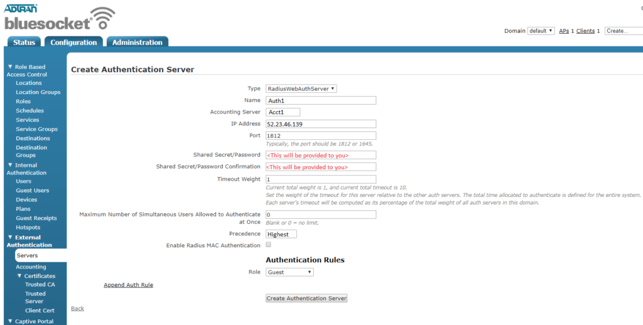 Click on
Create Authentication Server again and enter the following:
Click on
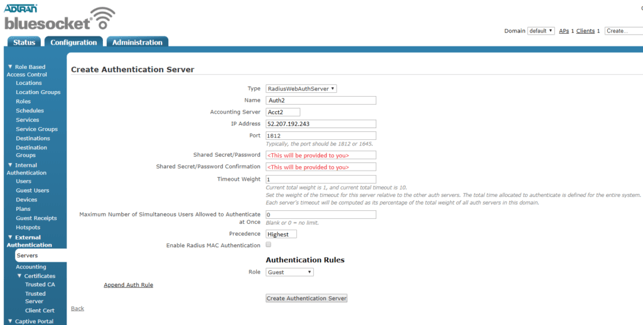
Create Authentication Server again and enter the following:
Next, on the left under Captive Portal, click on Forms. Click Create Login Form and enter the following: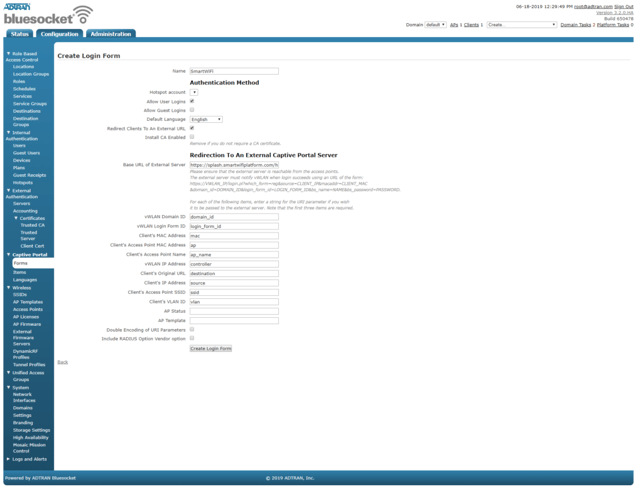
Next, on the left, under Role Based Access Control click on Destinations. Click on Create Destination Hostname and enter: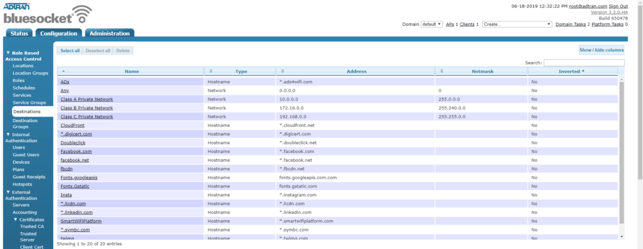 Next, on the left, click on
Destination Groups. Click on
Create Destination Group.
Next, on the left, click on
Destination Groups. Click on
Create Destination Group.
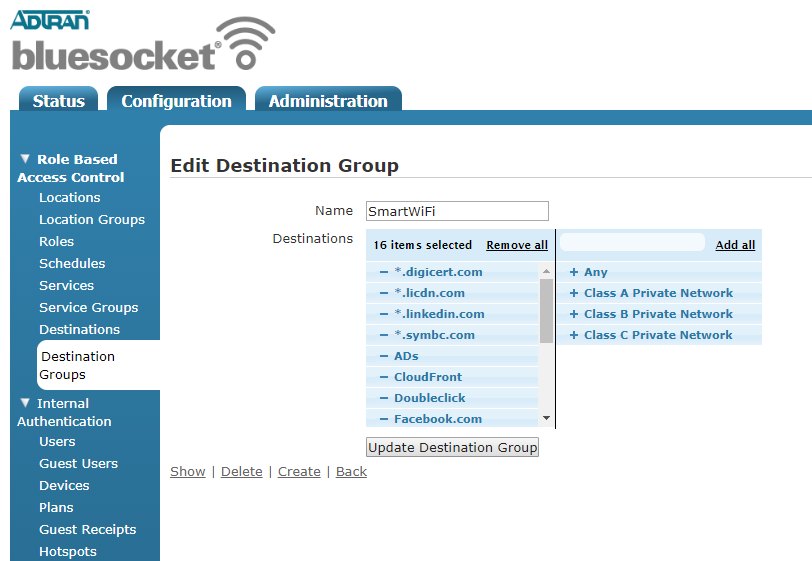 Next, on the left, click on
Roles. Click on the
Un-registered role. At the bottom, click on
Append Firewall Rule and choose:
Next, on the left, click on
Roles. Click on the
Un-registered role. At the bottom, click on
Append Firewall Rule and choose:
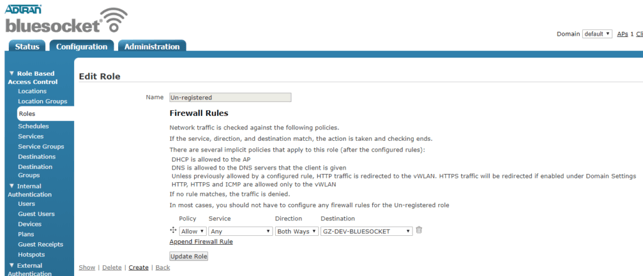 Next, on the left, click on
Roles. Click on the
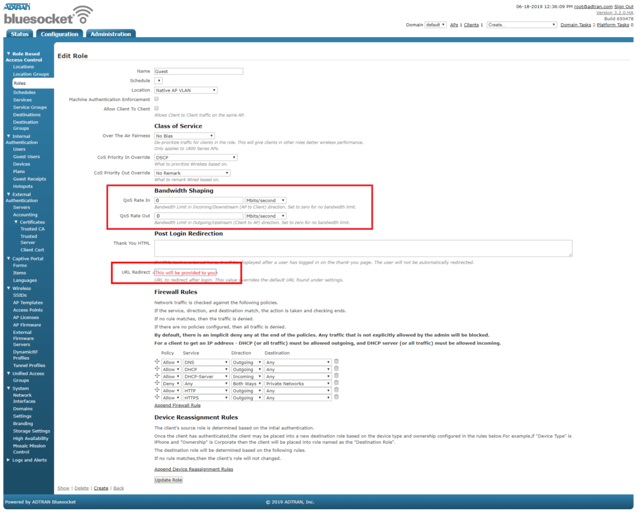
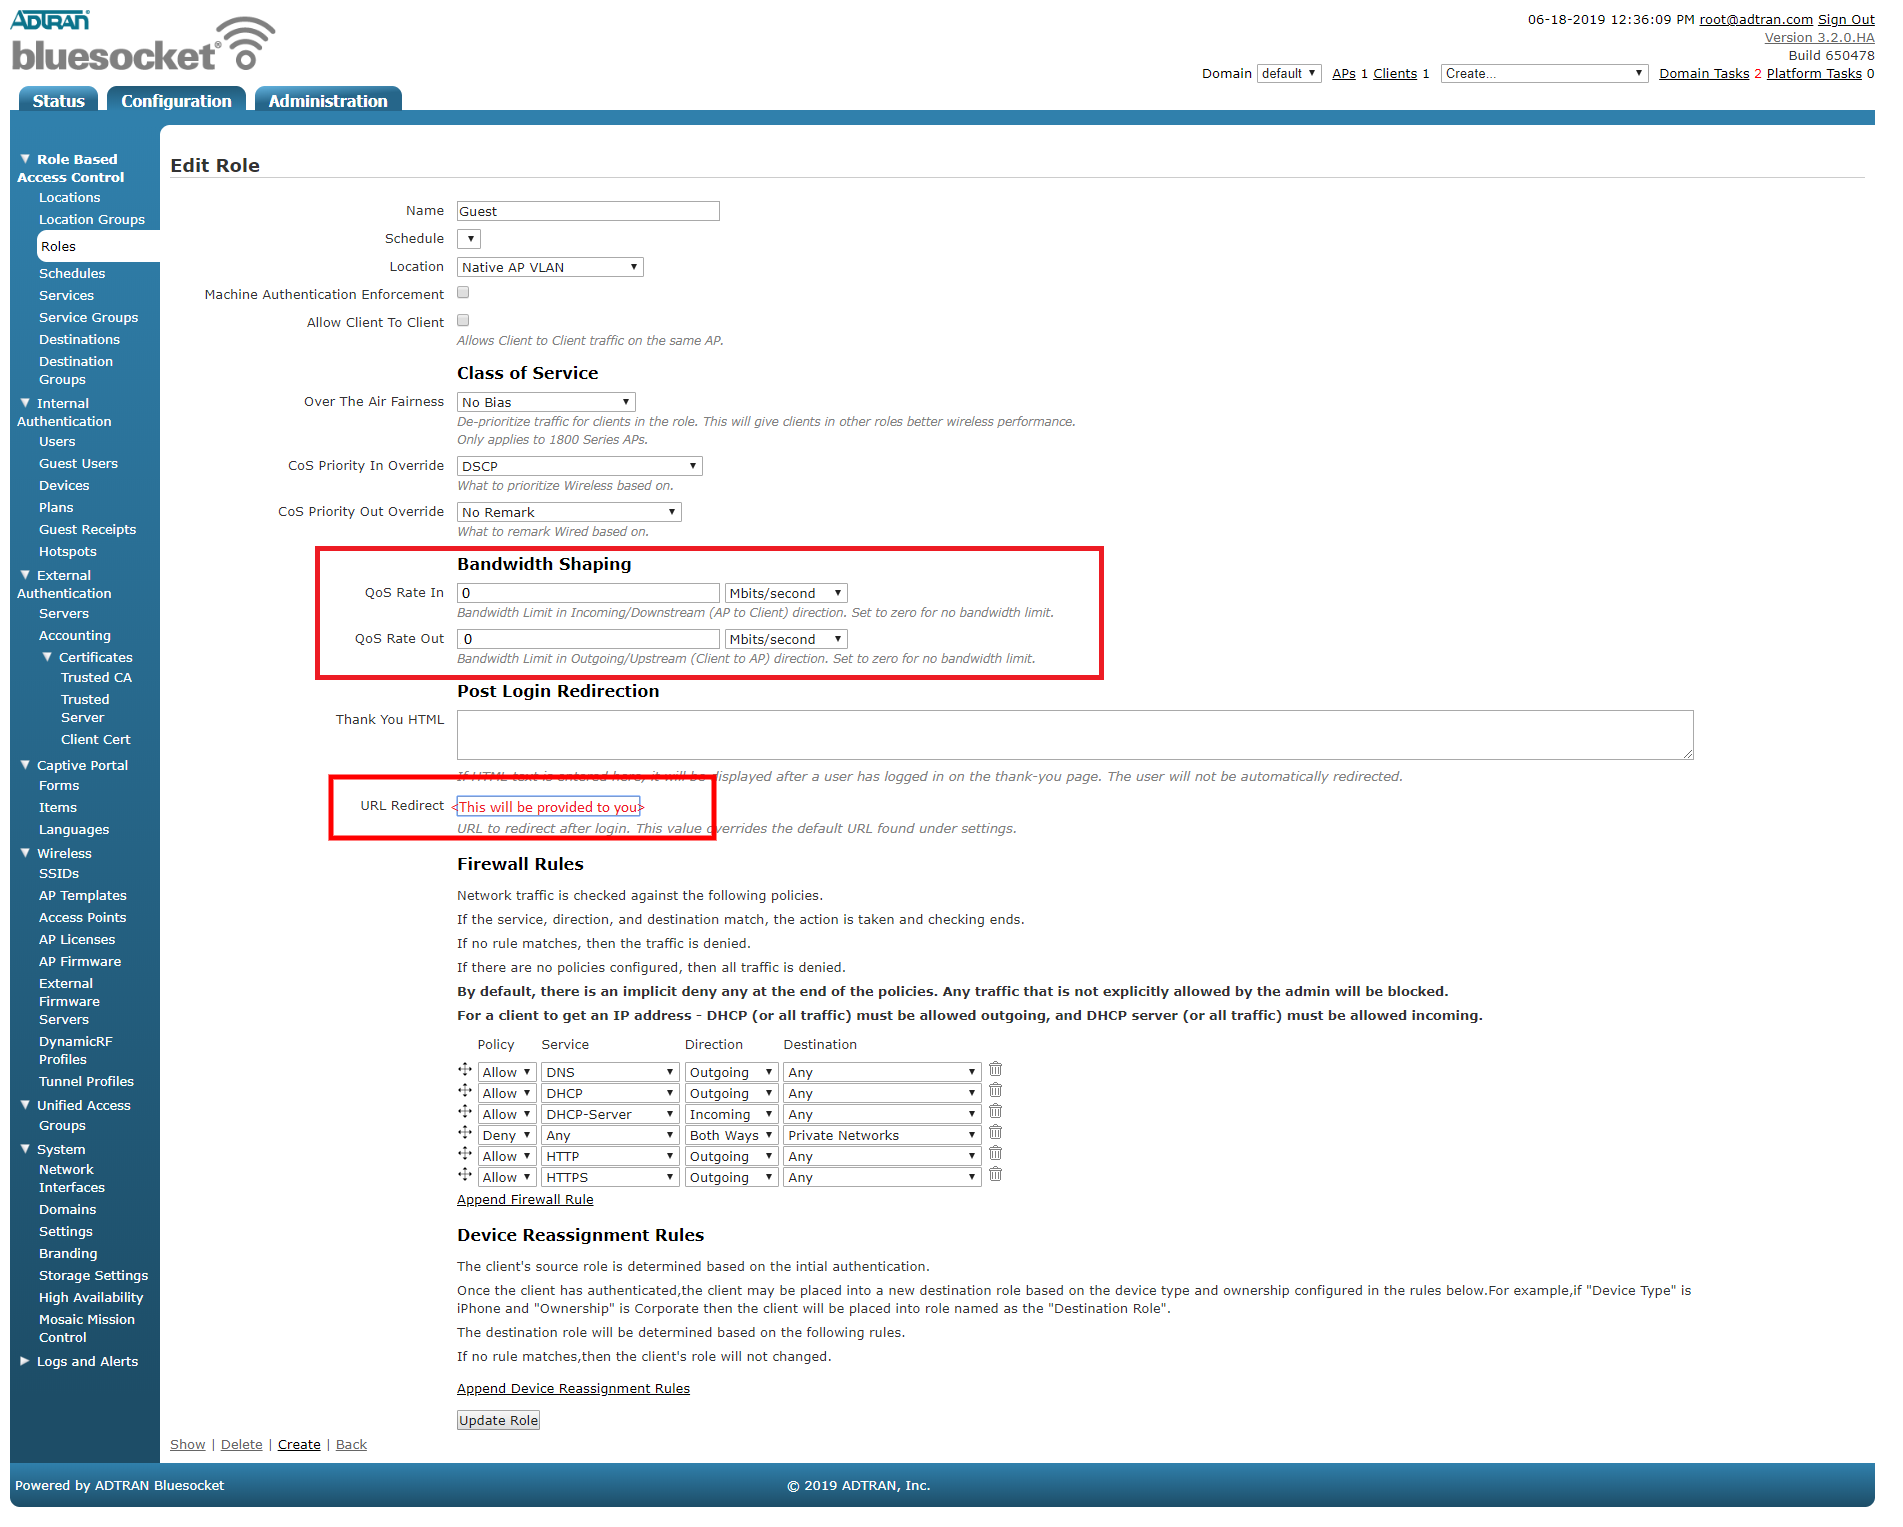
Guest role. Under the
Bandwidth Shaping section, enter:
QoS Rate In: Enter the desired download speed for guests.
QoS Rate Out: Enter the desired upload speed for guests. [ht_message mstyle="alert" title="" show_icon="" id="" class="" style="" ]Adtran Bluesocket vWLAN controllers do not support radius bandwidth throttling. You will need to set configure throttling on the controller level or set to 0 to disable bandwidth throttling to guests.[/ht_message] Under the
Post Login Redirection section, enter:
URL Redirect:
Next, on the left, click on
Roles. Click on the
Guest role. Under the
Bandwidth Shaping section, enter:
QoS Rate In: Enter the desired download speed for guests.
QoS Rate Out: Enter the desired upload speed for guests. [ht_message mstyle="alert" title="" show_icon="" id="" class="" style="" ]Adtran Bluesocket vWLAN controllers do not support radius bandwidth throttling. You will need to set configure throttling on the controller level or set to 0 to disable bandwidth throttling to guests.[/ht_message] Under the
Post Login Redirection section, enter:
URL Redirect:
Next, on the left, under Wireless click on SSIDs. Click on Create SSID and enter the following: Name: Smart WiFi (Or whatever you wish, this is what guests will see when connecting to WiFi) Broadcast SSID: Ticked Enable Captive Portal Authentication: Ticked Authentication: Open System Cipher: Disabled Un-registered Role: Un-registered Login Form: SmartWiFi Click on Create SSID.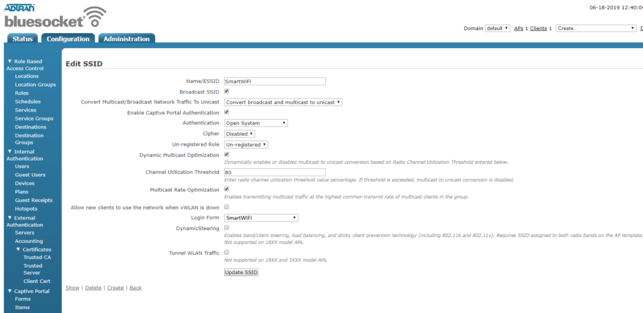 Finally, you need to apply this new configuration to your AP's in the usual way. For example, go to the
Status tab at the top and choose
Access Points. Highlight the ones you are using and click the
Apply button.
Finally, you need to apply this new configuration to your AP's in the usual way. For example, go to the
Status tab at the top and choose
Access Points. Highlight the ones you are using and click the
Apply button.
- The following information must be submitted to support before attempting the hardware configuration or guests will receive a hotspot deactivated message.
- MAC of every AP that will broadcast the Guest WiFi signal
- vWLAN Network Interface public address
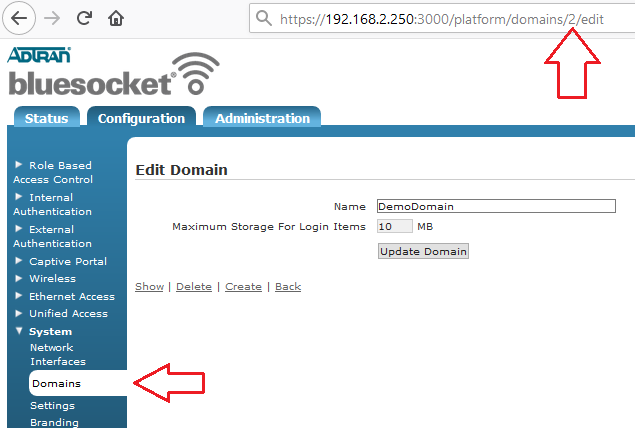
- vWLAN Domain ID Example of where to obtain the Domain ID-
 [/ht_message]
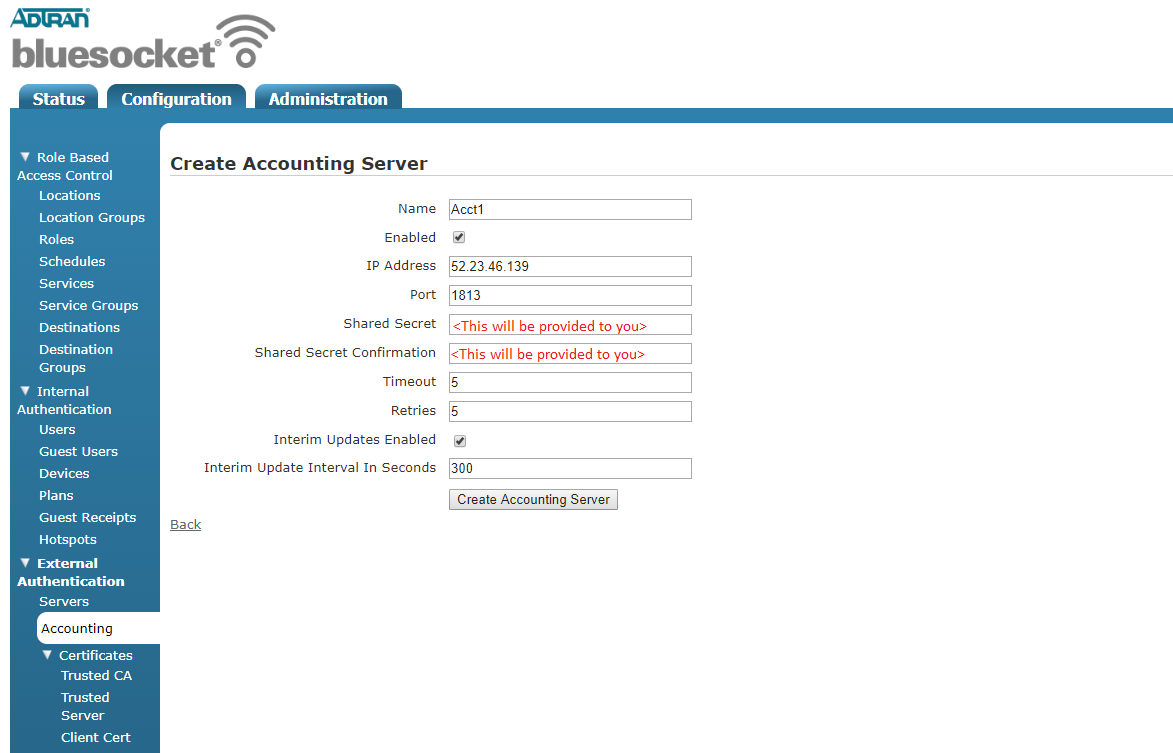
Log in to your Bluesocket WLAN controller At the top click on Configuration and then on the left, under External Authentication click on Accounting Click on Create Accounting Server and enter the following:
- Name: Acct1
- Enabled: Ticked
- IP Address: This will be provided to you
- Port: 1813
- Shared Secret:
- Shared Secret Confirmation:
- Timeout: 5
- Retries: 5
- Interim Updates Enabled: Ticked
- Interim Update Interval: 300
 Click on
Create Accounting Server again and enter the following:
Click on
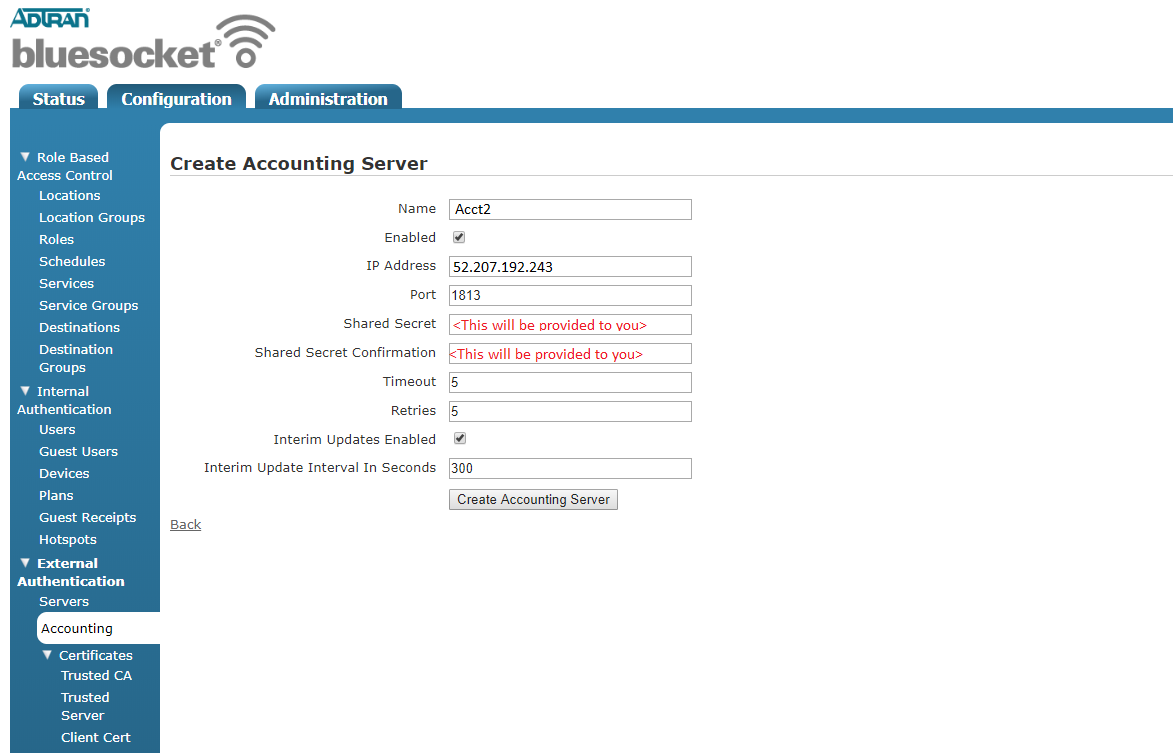
Create Accounting Server again and enter the following:
- Name: Acct2
- Enabled: Ticked
- IP Address: This will be provided to you
- Port: 1813
- Shared Secret:
- Shared Secret Confirmation:
- Timeout: 5
- Retries: 5
- Interim Updates Enabled: Ticked
- Interim Update Interval: 300
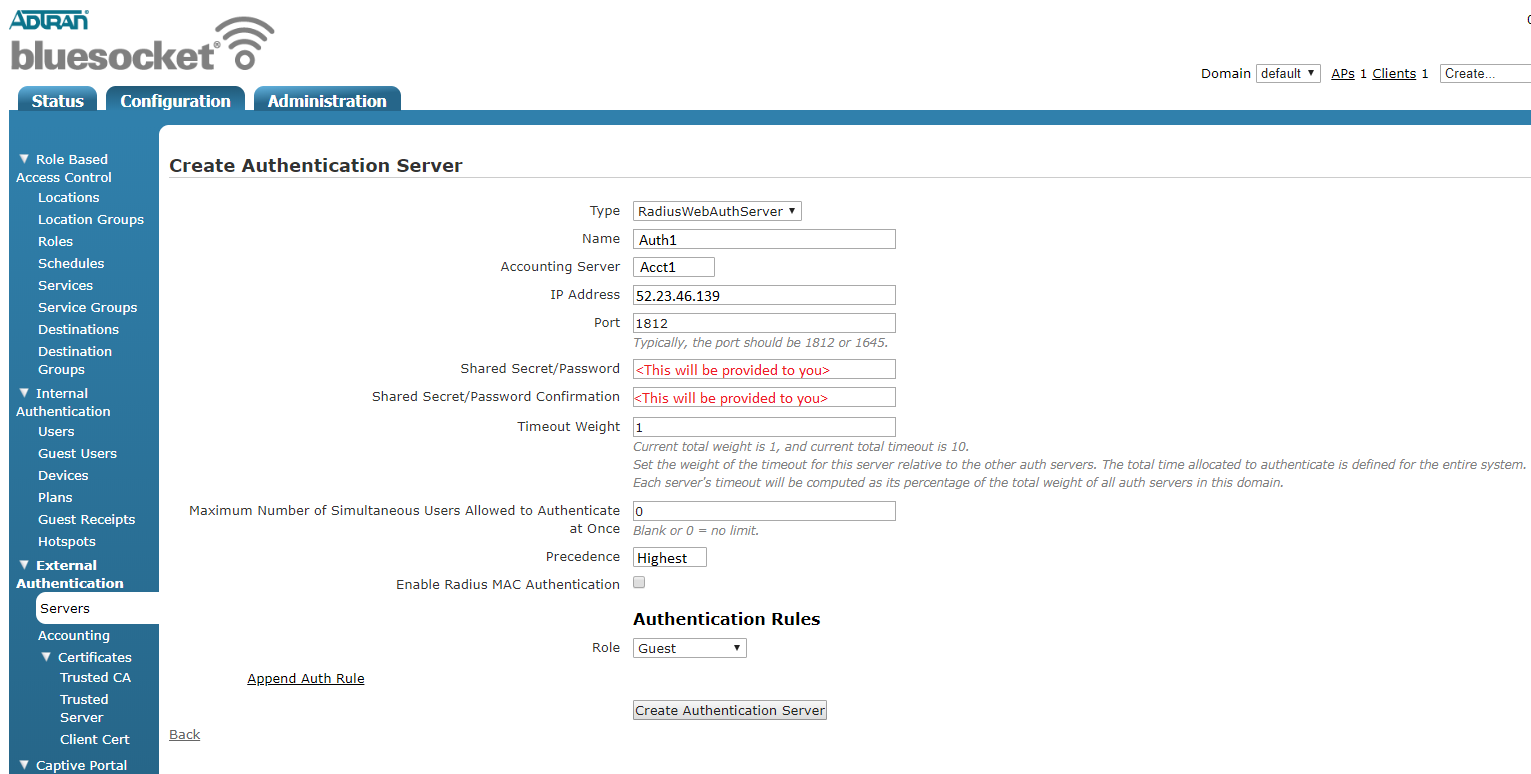
Next, on the left, under External Authentication click on Servers. Click on Create Authentication Server and enter the following:
- Type: RadiusWebAuthServer
- Name: Auth1
- Accounting Server: Acct1
- IP Address: This will be provided to you
- Port: 1812
- Shared Secret:
- Shared Secret Confirmation:
- Timeout Weight: 1
- Precedence: Highest
- Role: Guest
 Click on
Create Authentication Server again and enter the following:
Click on
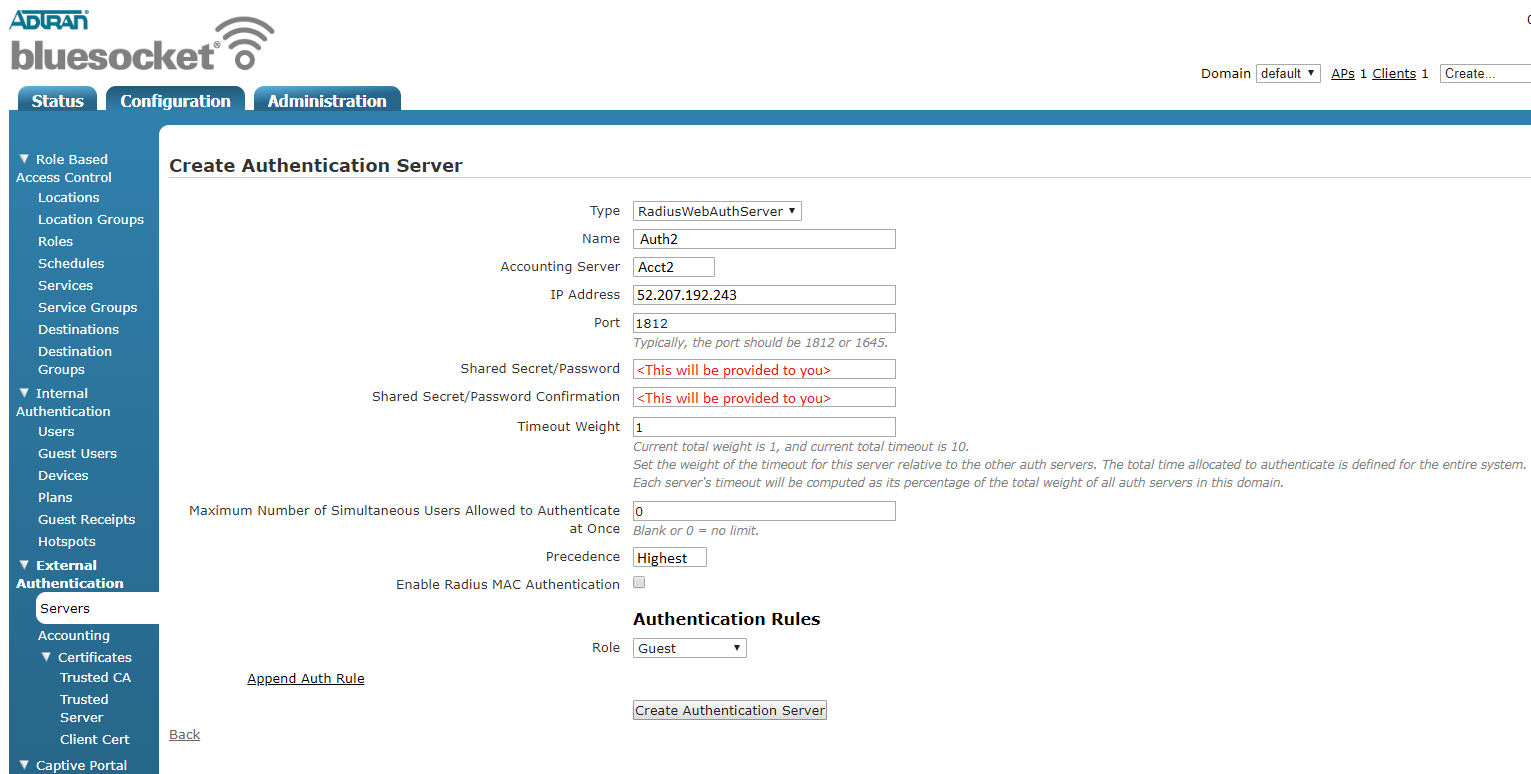
Create Authentication Server again and enter the following:
- Type: RadiusWebAuthServer
- Name: Auth2
- Accounting Server: Acct2
- IP Address: This will be provided to you
- Port: 1812
- Shared Secret:
- Shared Secret Confirmation:
- Timeout Weight: 1
- Precedence: Lowest
- Role: Guest
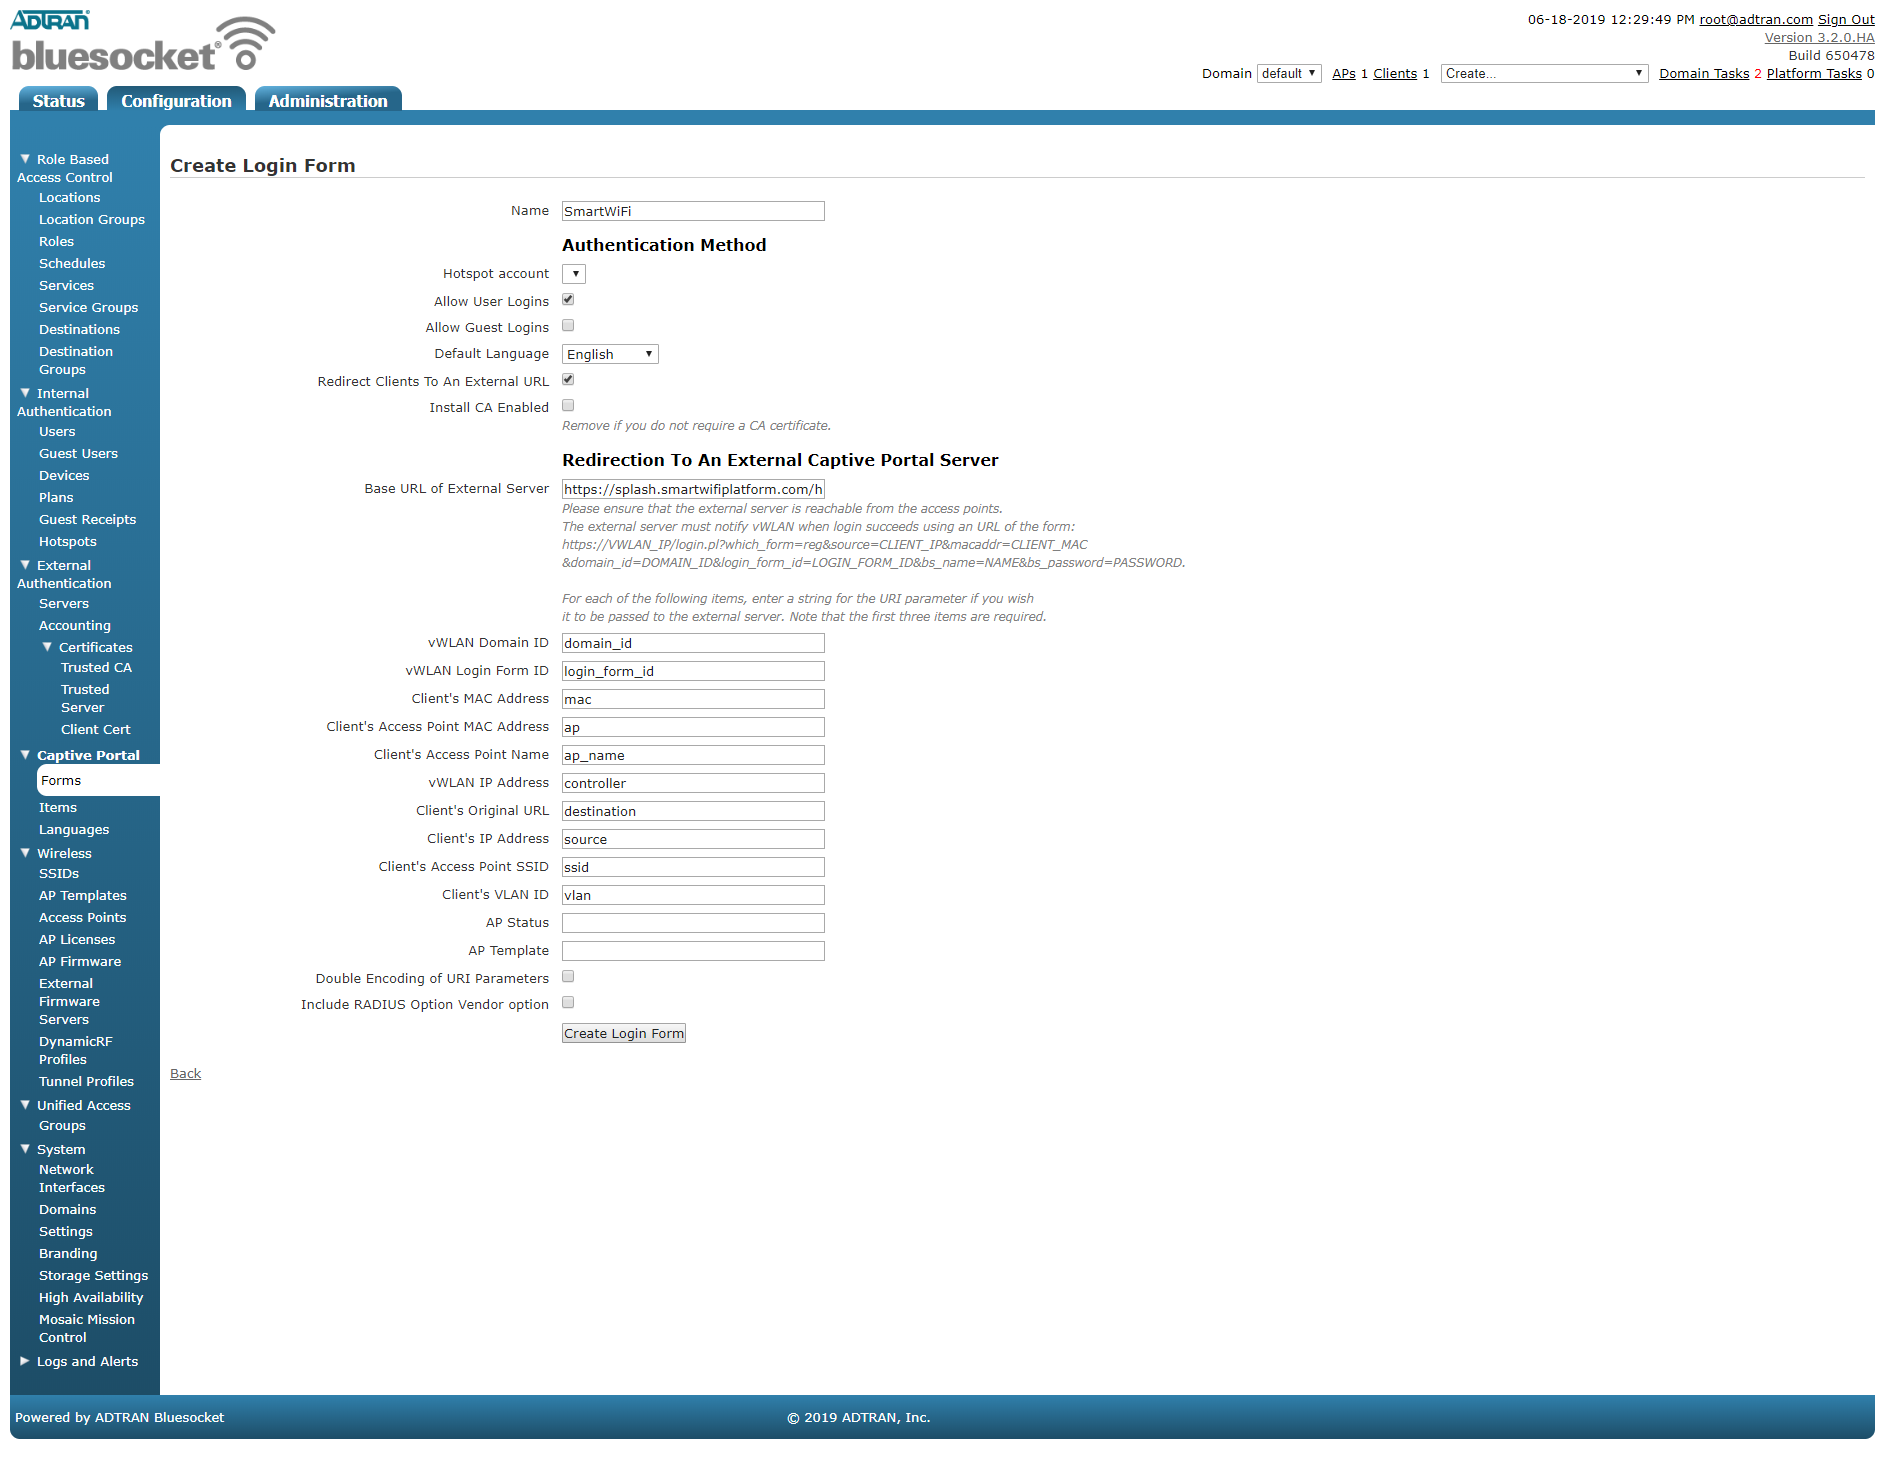
Next, on the left under Captive Portal, click on Forms. Click Create Login Form and enter the following:
- Name: SmartWiFi
- Allow User Logins: Ticked
- Allow Guest Logins: Unticked
- Redirect Clients to an External URL: Ticked
- Base URL of External Server:
- Clients Access Point MAC Address: ap
- Client's Access Point Name: ap_name
- vWLAN IP Address: controller
- Client's Original URL: destination
- Client's MAC Address: mac
- Client's IP Address: source
- Client's Access Point SSID: ssid
- Client's VLAN ID: vlan
- Double Encoding of URI Parameters: Unticked
- Include RADIUS Option Vendor option: Unticked
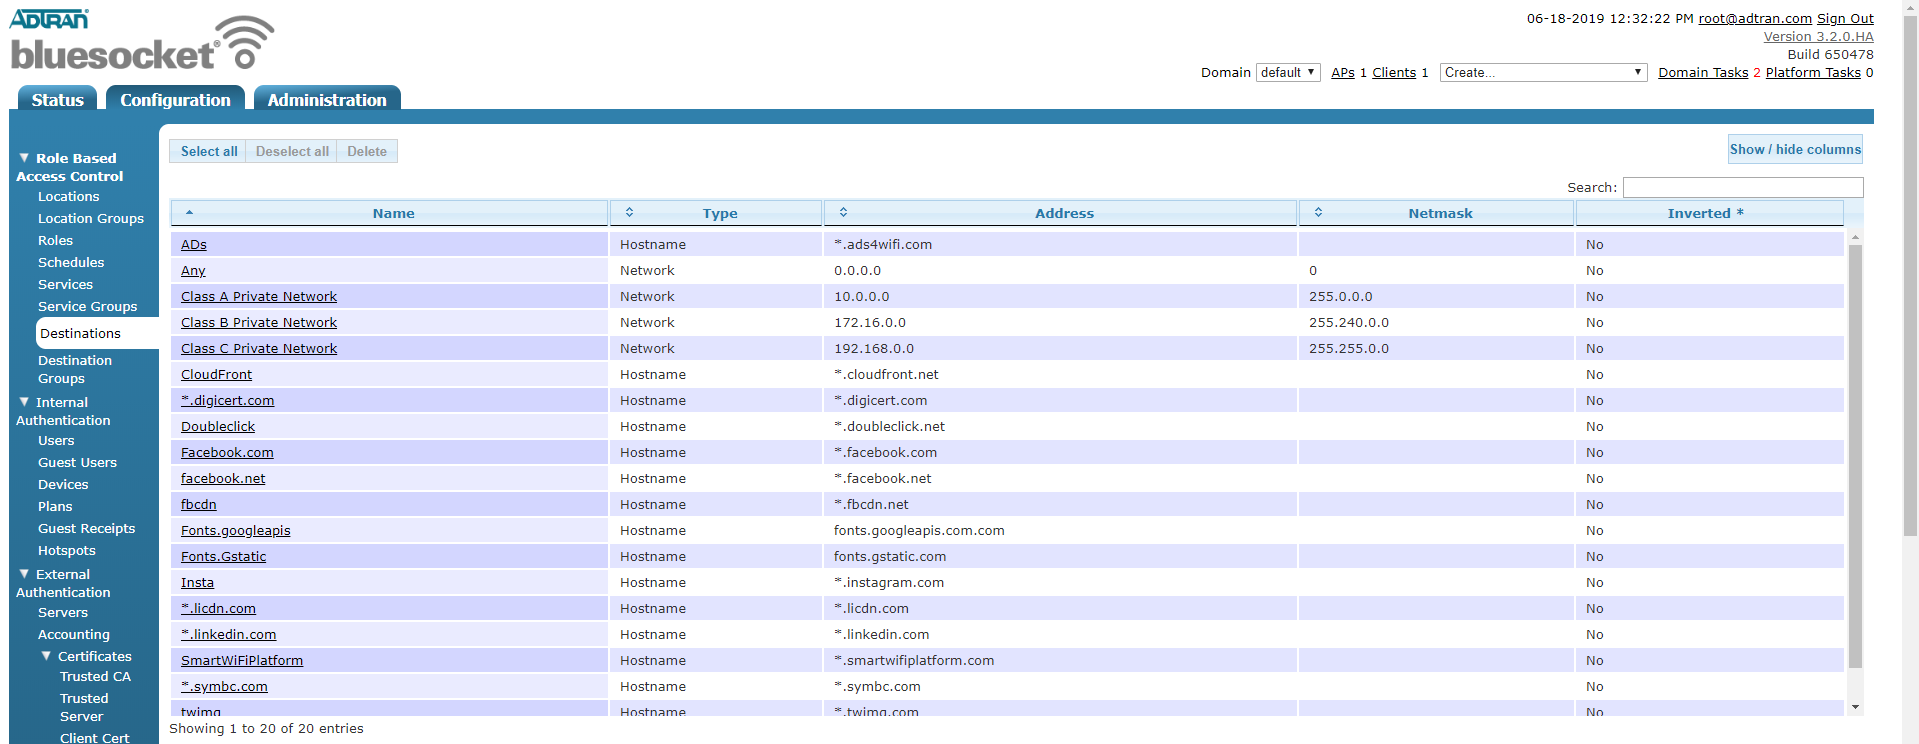
Next, on the left, under Role Based Access Control click on Destinations. Click on Create Destination Hostname and enter:
- Create a Destination Hostname for all the entries in the default wildcard walled garden list.
 Next, on the left, click on
Destination Groups. Click on
Create Destination Group.
Next, on the left, click on
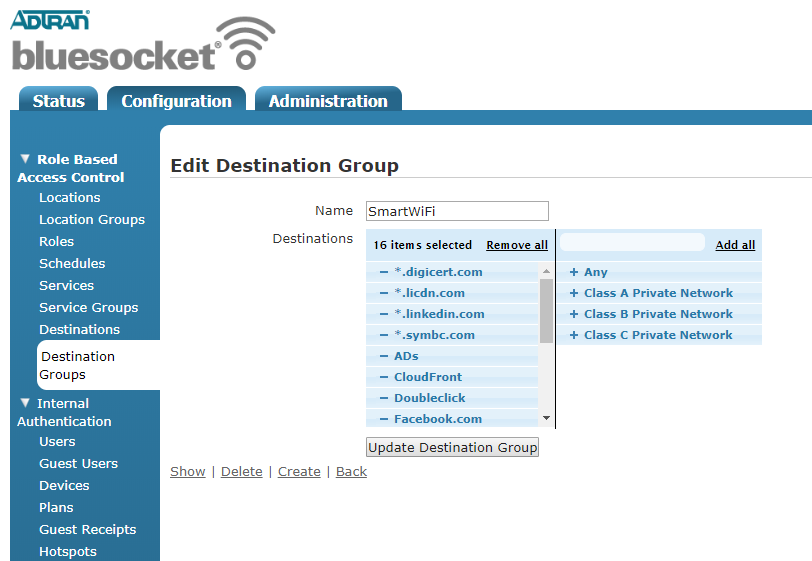
Destination Groups. Click on
Create Destination Group.
- Name: SmartWiFi
- Destinations: Click the + sign beside each domain on the right hand list to add all of these to the left list. Be sure not to add the "Any" rule.
 Next, on the left, click on
Roles. Click on the
Un-registered role. At the bottom, click on
Append Firewall Rule and choose:
Next, on the left, click on
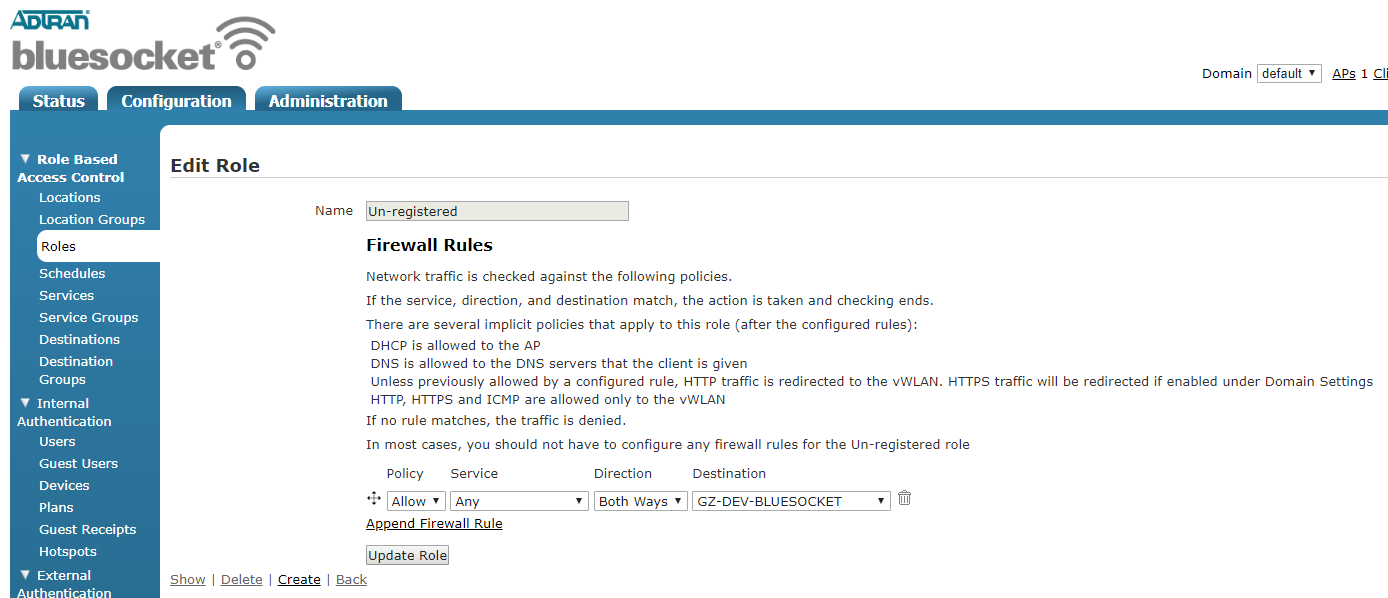
Roles. Click on the
Un-registered role. At the bottom, click on
Append Firewall Rule and choose:
- Policy: Allow
- Service: Any
- Direction: Both Ways
- Destination: under "Destination Groups" choose SmartWiFi
 Next, on the left, click on
Roles. Click on the
Guest role. Under the
Bandwidth Shaping section, enter:
QoS Rate In: Enter the desired download speed for guests.
QoS Rate Out: Enter the desired upload speed for guests. [ht_message mstyle="alert" title="" show_icon="" id="" class="" style="" ]Adtran Bluesocket vWLAN controllers do not support radius bandwidth throttling. You will need to set configure throttling on the controller level or set to 0 to disable bandwidth throttling to guests.[/ht_message] Under the
Post Login Redirection section, enter:
URL Redirect:
Next, on the left, click on
Roles. Click on the
Guest role. Under the
Bandwidth Shaping section, enter:
QoS Rate In: Enter the desired download speed for guests.
QoS Rate Out: Enter the desired upload speed for guests. [ht_message mstyle="alert" title="" show_icon="" id="" class="" style="" ]Adtran Bluesocket vWLAN controllers do not support radius bandwidth throttling. You will need to set configure throttling on the controller level or set to 0 to disable bandwidth throttling to guests.[/ht_message] Under the
Post Login Redirection section, enter:
URL Redirect:
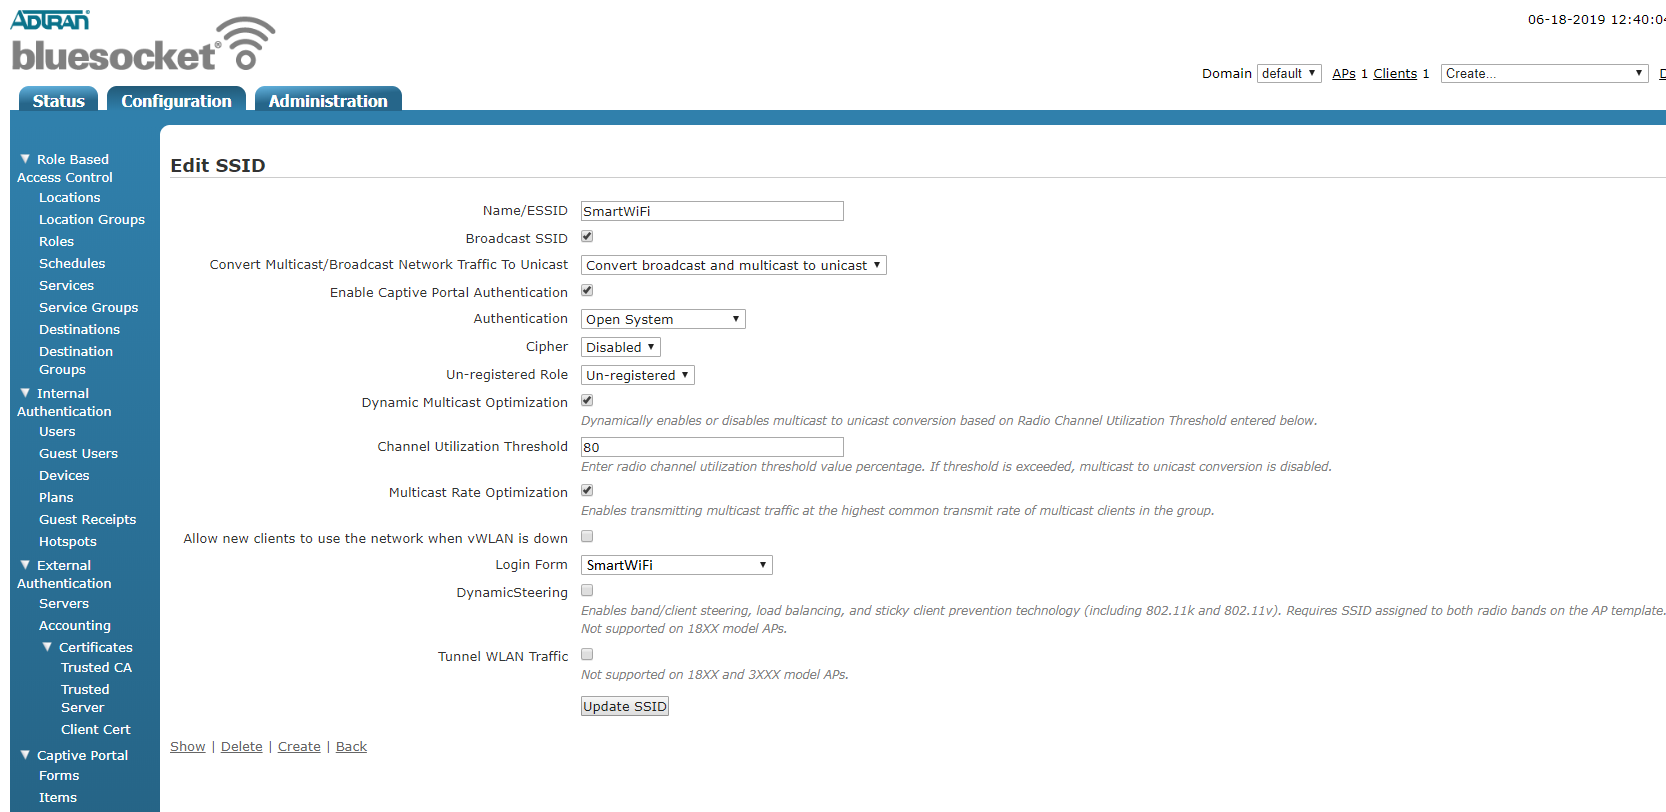
Next, on the left, under Wireless click on SSIDs. Click on Create SSID and enter the following: Name: Smart WiFi (Or whatever you wish, this is what guests will see when connecting to WiFi) Broadcast SSID: Ticked Enable Captive Portal Authentication: Ticked Authentication: Open System Cipher: Disabled Un-registered Role: Un-registered Login Form: SmartWiFi Click on Create SSID.
 Finally, you need to apply this new configuration to your AP's in the usual way. For example, go to the
Status tab at the top and choose
Access Points. Highlight the ones you are using and click the
Apply button.
Finally, you need to apply this new configuration to your AP's in the usual way. For example, go to the
Status tab at the top and choose
Access Points. Highlight the ones you are using and click the
Apply button.
Troubleshooting Splash page
- When presenting the splash page guests may see a SSL certificate error. Please see this article regarding Manufacturer SSL certificates.
- If a hotspot deactivated message is presented please ensure all the AP MACs have been properly added as gateways to the correct hotspot.
- If devices are redirected to the splash page URL but the page fails to load please ensure the Destination Group walled garden entries were all added correctly and applied to the correct role.