
The following instructions outline how to apply the Smart WiFi platform’s configuration script to your MikroTik to configure the unit to your hotspot. The script can be used as a framework to get any MikroTik device configured to the platform. Additional changes to the MikroTik may be required to support various models and use cases. This guide assumes your MikroTik can be reset into a default state with no configuration. You will need access to the Marketing 4 WiFi dashboard and a computer with Winbox installed to complete this guide. Please make sure any firewall rules, web content filters, and other security measures have been configured to interface with the platform.
Smart WiFi Dashboard Setup
[ht_message mstyle="alert" title="" show_icon="" id="" class="" style="" ]Please contact support if you do not see the option to add Gateways to your hotspot.[/ht_message]
[ht_toggle title="Adding Gateway to your Hotspot" id="" class="" style="" ]The MAC of your MikroTik must be added to your hotspot.
- Login to your Smart WiFi dashboard
- Using the navigation panel to the left, select Network> Gateways
- Click the Add Gateway option to the top right
- Select Hotspot: Select your desired hotspot
- Gateway Name: Enter a name for this Gateway(s)
- Gateway Type: MikroTik
- MAC Address: Enter the MAC Address of your AP. (use the blue + icon to the right to add multiple AP MACs at once)
- Wireless SSID: SmartWiFi (Or whatever you wish)
- Wireless LAN Ports to Splash: Turn this on if you want the LAN ports 2 through 5 to serve the splash page
- Client Isolation: ON
- WLAN2: Turn this on if you want to broadcast the Guest WiFi SSID on the 5GHz radio
- Press Submit
- Now on the Edit gateway page for your MikroTik, press “View Script for Router OS” for the version of Router OS your MikroTik uses
- Copy the entire script that is displayed in a new tab, including the blank space at the bottom. Save the text for use later in this guide.
- This completes the Gateway creation portion of this guide
[/ht_toggle]
MikroTik Configuration
- Connect your MikroTik device Eth1 port to a port on your local network that provides DHCP and a connection to the internet
- Connect your computer with WinBox to another Ethernet port on the MikroTik OR connect your computer to the same Subnet that the MikroTik Eth1 is on
- Open WinBox on your computer
- Select the Neighbors tab
- In the table at the bottom of WinBox, click on the MAC of your MikroTik to add it to the connect To setting of your WinBox window
You may have to click Refresh before you can see the MikroTik - Enter the Credentials for your MikroTik and press Connect
- Now connected to your MikroTik, use the menu to the left and select System > Reset Configuration
- Check the boxes for No Default Configuration and Do Not Backup and then press Reset Configuration
- The device will power cycle as part of the reset process, once it is complete Connect to the MikroTik again
- Use the menu to the left and click New Terminal
- Paste the entire script collected from the Marketing 4 WiFi dashboard’s Edit Gateway page for this MikroTik
- The script from the dashboard contains several line returns at the bottom of it to ensure the whole script runs. It is still possible you may have to press the Enter key a couple times to run the final line of the script.
- If the script runs successfully, the last thing you should see is two messages stating “Status: finished” twice.
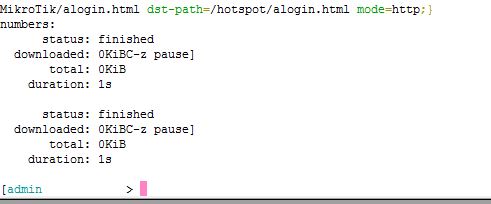
- If WinBox kicks you out the first time you paste the script, simply log back in and paste the script again. This can occur because the interface that you’re using to connect to the MikroTik may be reset during the configuration process.
- After the script has run successfully, use the menu panel to the left to select System > Reboot and then reboot the MikroTik.
- Once the power cycle is complete your MikroTik configuration to your Marketing 4 WiFi hotspot is complete.
- As a final step, be sure to assign a password to admin user of the MikroTik by using the menu panel to the left to select System > Password
[ht_message mstyle="alert" title="" show_icon="" id="" class="" style="" ]
Disclaimer on hardware configuration guides in the KB:
This equipment has been integrated and tested in our labs with the Smart WiFi Platform using the firmware versions below.
- Router OS 6.49.19
- Router OS 7.12.1
LIMITED HARDWARE SUPPORT: Hardware manufacturers frequently make changes to firmware, controllers and GUI’s. The information below may be out of date or images may be different and is to be used as a general reference guide. We do offer additional limited support to help with trouble-shooting and we highly recommend that you have a hardware support agreement and/or access to a hardware support engineering representative from the manufacturer.
Additional Mikrotik Support Resources:
- Contact the distributor or company you purchased the equipment from
- Contact Mikrotik support at support@mikrotik.com or by visiting their website at https://www.mikrotik.com/support
- Contact and hire a certified Mikrotik consultant. Find a consultant on their website at https://mikrotik.com/consultants
[/ht_message]
Troubleshooting Tips
If you do not get to the Finished Finished step of running the script the common cause is the MikroTik is not able to connect to the internet. Make sure the MikroTik is patched into your router using the corr7ect ports.