Reach out to your Service Provider if you're interested in finding out if your hotspot can support SecurePass.
If your Smart WiFi hotspot has SecurePass enabled, guests that purchase a Multi Device Guest Plan will be served a password unique to their Guest Plan that can be used to connect to the SecurePass WiFi network.
To configure the SecurePass WiFi network, follow the guide for your compatible hardware below.
Ruckus SmartZone Configuration Guide
Ruckus ZoneDirector Configuration Guide
Ruckus Cloud Configuration Guide
Cambium Configuration Guide
TP-Link Omada Pro Configuration Guide
NetExperience Configuration Guide
Ubiquiti Unifi Configuration Guide
Please ensure you report the name of the secure WiFi network to support and that you're Guest Plans are properly configured so your guests will receive their personal wifi passwords. If the correct network name has not been reported to support, guest's passwords will not work to connect.
Ruckus SmartZone Configuration Guide
- Login to the SmartZone dashboard
- Using the navigation panel to the left, click Services & Profiles > Authentication
- Click the Proxy (SZ Authenticator) tab at the top and the click the ‘+ Create’ button
- Name: securepass_auth
- Service Protocol: RADIUS
- Primary Server
- IP Address: You will be provided this by your Service Provider
- Port: 1812
- Shared Secret: You will be provided this by your Service Provider
- Secondary Server
- IP Address: You will be provided this by your Service Provider
- Port: 1812
- Shared Secret: You will be provided this by your Service Provider
- Using the navigation panel to the left, click Wireless LANs and click the ‘+ Create’ button
- General Options
- Name: SecurePass (or whatever you wish)
- SSID: Enter your desired network name. This value must be reported to your Service Provider.
- Authentication Options
- Authentication Type: Standard usage
- Authentication Method: Open
- Encryption Options
- Encryption Method: WPA2
- Algorithm: AES
- 802.11w MFP: Disabled
- Dynamic PSK: External
- Authentication & Accounting Service
- Authentication Service: securepass_auth
- Options
- Wireless Client Isolation: ON
- General Options
- Press OK
Ruckus ZoneDirector Configuration Guide
- Login to your ZoneDirector dashboard
- Using the Navigation panel, select Services & Profiles > AAA Servers
- On the Authentication/Accounting Servers page click the +Create button
- Name: securepass_auth
- Type: RADIUS
- Encryption: Unchecked
- Auth Method: CHAP
- Backup RADIUS: Checked
- First Server-
- IP Address: You will be provided this by your Service Provider
- Port: You will be provided this by your Service Provider
- Shared Secret: You will be provided this by your Service Provider
- Confirm Secret: You will be provided this by your Service Provider
- Second Server
- IP Address: You will be provided this by your Service Provider
- Port: You will be provided this by your Service Provider
- Shared Secret: You will be provided this by your Service Provider
- Confirm Secret: You will be provided this by your Service Provider
- Press OK
- Back on the Authentication/Accounting Servers page click the +Create button again
- Name: securepass_acct
- Type: RADIUS Accounting
- Encryption: Unchecked
- Backup RADIUS: Checked
- First Server-
- IP Address: You will be provided this by your Service Provider
- Port: You will be provided this by your Service Provider
- Shared Secret: You will be provided this by your Service Provider
- Confirm Secret: You will be provided this by your Service Provider
- Second Server
- IP Address: You will be provided this by your Service Provider
- Port: You will be provided this by your Service Provider
- Shared Secret: You will be provided this by your Service Provider
- Confirm Secret: You will be provided this by your Service Provider
- Press OK
- On the Authentication/Accounting Servers page click the +Create button
- Using the Navigation panel, select Wireless LANs
- Select your desired WLAN Group
- Press the +Create button (Or Edit your desired existing WLAN)
- General
- Name: SecurePass(or whatever you wish)
- ESSID: Enter your desired network name. This value must be reported to your Service Provider.
- WLAN Usages
- Type: Standard Usage
- Authentication
- Method: Open
- Dynamic-PSK: External
- DPSK Authentication Server: securepass_auth
- Encryption
- Method: WPA2
- Algorithm: AES
- 802.11w MFP: Disabled
- Advanced Options
- Wireless Client Isolation: Check both boxes
- Accounting Server: securepass_acct
- Send Interim-Update every: 10 minutes
- General
- Press OK
Ruckus Cloud Configuration Guide
- Login to your Ruckus Cloud portal
- Using the navigation panel select Network Control> Policies & Profiles
- Click on the RADIUS Server tile
- Click the 'Add RADIUS Server' button
- Profile Name: securepass_auth
- Type: Authentication RADIUS Server
- Primary Server
- IP Address: You will be provided this by your Service Provider
- Port: You will be provided this by your Service Provider
- Shared Secret: You will be provided this by your Service Provider
- Click Add Secondary Server
- Secondary Server
- IP Address: You will be provided this by your Service Provider
- Port: You will be provided this by your Service Provider
- Shared Secret: You will be provided this by your Service Provider
- Click Add
- Click the 'Add RADIUS Server' button again
- Profile Name: securepass_acct
- Type: Accounting RADIUS Server
- Primary Server
- IP Address: You will be provided this by your Service Provider
- Port: You will be provided this by your Service Provider
- Shared Secret: You will be provided this by your Service Provider
- Click Add Secondary Server
- Secondary Server
- IP Address: You will be provided this by your Service Provider
- Port: You will be provided this by your Service Provider
- Shared Secret: You will be provided this by your Service Provider
- Click Add
- Using the navigation panel select Wi-Fi > Wi-Fi Networks List
- Click the 'Add Wi-Fi Network' button
- Network Details
- Network Name: Enter your desired network name. This value must be reported to your Service Provider
- Network Type: Dynamic Pre-Shared Key
- Press Next
- DPSK Settings
- Security Protocol: WPA2
- Use RADIUS Server
- Authentication Server: securepass_auth
- Accounting Service: Enabled
- Accounting Server: securepass_acct
- Click Show more settings
- Dynamic VLAN: Disabled
- Network Control > Client Isolation: Enabled
- Press Next
- Venues
- Select the venue you would like to enable the SecurePass network
- Press Next
- Summary
- Review the settings on the page to ensure everything matches this document and then press Add
- Network Details
Cambium Configuration Guide
- Login to your CnMaestro dashboard
- Using the navigation panel select Configuration > Wi-Fi Profiles
- Select the WLANS tab
- Click the Add button
- WLAN Tab
- Type: Enterprise Wi-FI
- Name: SecurePass WiFi(or whatever you wish)
- Enabled: Checked
- SSID: Enter your desired network name. This value must be reported to your Service Provider
- Client Isolation: Network Wide
- Session Timeout: 600
- AAA Servers Tab
- Authentication Server
- #1. Host: You will be provided this by your Service Provider
- #1. Secret: You will be provided this by your Service Provider
- #1 Port: You will be provided this by your Service Provider
- #2. Host: You will be provided this by your Service Provider
- #2. Secret: You will be provided this by your Service Provider
- #2. Port: You will be provided this by your Service Provider
- Accounting Server
- #1. Host: You will be provided this by your Service Provider
- #1. Secret: You will be provided this by your Service Provider
- #1 Port: You will be provided this by your Service Provider
- #2. Host: You will be provided this by your Service Provider
- #2. Secret: You will be provided this by your Service Provider
- #2. Port: You will be provided this by your Service Provider
- Accounting Mode: Start-Interim-Stop
- Accounting Packet: Checked
- Advanced Settings
- NAS-Identifier: You will be provided this by your Service Provider
- Dynamic VLAN: Unchecked
- Authentication Server
- Press Save
- WLAN Tab
- Using the navigation panel select Configuration > Wi-Fi Profiles
- On the AP Groups tab, select your desired AP Group
- Basic Tab
- Use the Add WLAN button to add the WLAN created in step 4 to the AP Group.
- Make sure you note what # the WLAN is in the order of your AP Group, as it is used in the next step You will use this in the next step.
- User-Defined Overrides tab
- Paste the text below into the user defined overrides text area. You must replace the # in the text below with the order number of the WLAN in your AP Group as mentioned in the previous step.
!
wireless wlan #
epsk RADIUS
!
- Paste the text below into the user defined overrides text area. You must replace the # in the text below with the order number of the WLAN in your AP Group as mentioned in the previous step.
- Basic Tab
TP-Link Omada Pro Configuration Guide
- Login to your Omada Pro controller
- Using the navigation panel select Profiles > RADIUS Profiles
- Click the 'Create New RADIUS Profile' button
- Name: securepass
- Authentication Server IP/URL: You will be provided this by your Service Provider
- Authentication Port: You will be provided this by your Service Provider
- Authentication Password: You will be provided this by your Service Provider
- RADIUS Accounting: Checked
- Accounting Server IP/URL: You will be provided this by your Service Provider
- Accounting Port: You will be provided this by your Service Provider
- Accounting Password: You will be provided this by your Service Provider
- Press Save
- Using the navigation panel select Wireless Networks > WLAN
- Click the 'Create New Wireless Network' button
- Network Name: Enter your desired network name. This value must be reported to your Service Provider
- Security: PPSK with RADIUS
- RADIUS Profile: securepass
- Authentication type: Generic RADIUS with unbound MAC
- NAS ID: You will be provided this by your Service Provider
- Set all other values to best practices
- Press Apply
NetExperience Configuration Guide
- Login to the NetExperience customer portal
- Using the navigation bar select Configure> Profiles
- Click the 'Add' button
- Type: RADIUS
- Profile Name: securepass
- Click the 'Add Authentication Server' button
- Primary Authentication Server
- Address: You will be provided this by your Service Provider
- Shared Secret: You will be provided this by your Service Provider
- Port: You will be provided this by your Service Provider
- Secondary Authentication Server
- Address: You will be provided this by your Service Provider
- Shared Secret: You will be provided this by your Service Provider
- Port: You will be provided this by your Service Provider
- Click the 'Add Accounting Server' button twice
- Primary Accounting Server
- Use the Same Primary Server for Accounting: Checked
- Port: You will be provided this by your Service Provider
- Secondary Accounting Server
- Use the Same Primary Server for Accounting: Checked
- Port: You will be provided this by your Service Provider
- Click the 'Add' button at the top of the page
- The portal will redirect you back to the Profiles page after creating the RADIUS Profile. On this page click the 'Add' button again.
- Type: Wireless Network (SSID)
- Profile Name: SecurePass (or whatever you wish)
- Mode: WPA2 RADIUS Multi-PSK
- RADIUS
- RADIUS Proxy: Manual
- RADIUS Profile: securepass
- RADIUS Accounting Interval: 300
- NAS ID: Manual
- Enter NAS ID: You will be provided this by your Service Provider
- NAS IP: WAN
- SSID
- SSID Name: Enter your desired network name. This value must be reported to your Service Provider
- Broadcast SSID: Show SSID
- Network Connectivity
- Mode: NAT
- Set all other values to best practices
- Click the 'Add' button at the top of the page
Ubiquiti UniFi Configuration
Disclaimer
The Ubiquiti UniFi integration described in this guide is considered beta functionality within our platform due to current limitations in the UniFi product line. While the integration is available for customer use, it will require additional manual configuration, including but not limited to VLAN setup, device‑specific adjustments, and network design considerations.
This feature is provided as‑is and should be implemented at your discretion. Behavior may vary depending on firmware versions, network environments, and UniFi controller configurations. Our team will continue to refine and improve this integration as UniFi’s capabilities evolve, but we cannot guarantee full compatibility or support for all deployment scenarios at this time.
By proceeding with the setup, you acknowledge that this feature may not yet meet all production‑grade performance or reliability standards and should be tested in accordance with your organization’s change‑management and validation processes.
Pre-configuration check list
The following steps must be completed before proceeding with the Unifi Network Configuration
- Create VLANs on your Unifi controller to represent the maximum number of Passwords you want to be possible from your hotspot at any time.
- Using the range of VLANs configured in the previous step, enable and configure the hotspot setting for SecurePass Include VLAN as described in Section 2 Step 3.5 of this guide.
- For the SecurePass Default VLAN Message use a message describing that your hotspot is at maximum capacity at this time and is unable to provide more passwords.
- Paste the following snippet into your Hotspots splash page using the drag-and-drop builder.
<script> // The intent of this script is to prevent the use of Vouchers or purchasing of Guest Plans when the hotspot is out of unique SecurePass VLANs document.addEventListener("DOMContentLoaded", function () { if (window.location.href.includes("manageV2SplashPages")) { return; } var dangerAlert = document.querySelector(".alert.alert-danger"); if (dangerAlert) { var buttons = document.querySelectorAll(".swp-social-voucher, .connect-btn-payment"); buttons.forEach(function(button) { button.disabled = true; button.classList.add("disabled"); }); } }); </script> - The following IP addresses must be able to communicate with your Unifi controller form it’s WAN interface.
13.217.123.156/32 34.204.9.182/32 100.20.214.243/32 52.23.18.184/32
- Open a support case with GoZone with the Subject line SecurePass with Unifi and include the name of the Hotspot you’re working on in the body of your message.
Unifi Wireless Network Configuration
- Login to your Unifi controller
- Select your desired location and then click the Settings cog wheel
- On the WiFi tab, Click Create New to add a new WiFi network (or edit your desired existing network)
- Name: Enter the value used in Section 2 step 3.4
- Password: Leave blank
- Advanced: Set to Manual
- Security section
- Security Protocol: WPA2
- Private Pre-Shared Keys: Checked
- Add one default password using the Native Network
- Click Create
Example Guest Experience
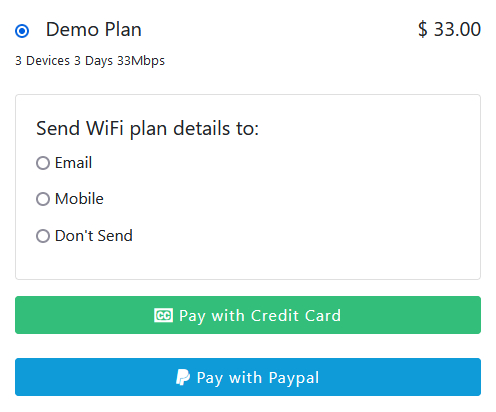
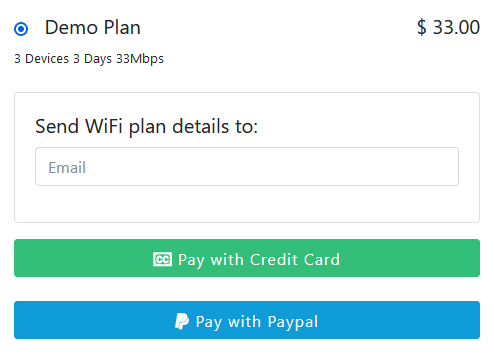
- When a guest selects a Multi Device Guest Plan to purchase from a hotspot with SecurePass enabled they'll be presented with options on how to receive their private password.
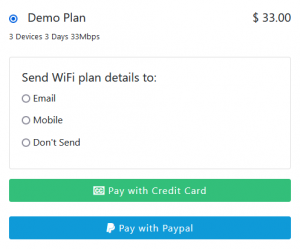
The platform can also be configured to require a specific method.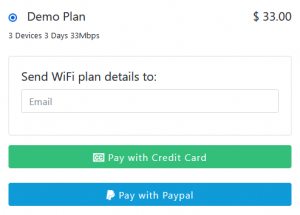
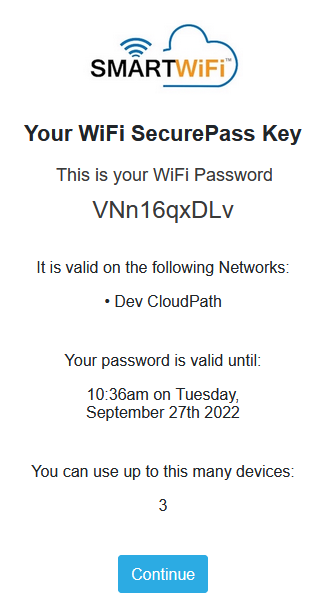
- After successfully purchasing the plan regardless of selection devices will be presented an interstitial page displaying key information about the PSK associated to their purchased plan.